Fill your raised gardens beds for cheap - a comprehensive guide to Hügelkultur
In sustainable gardening practices, hügelkultur stands out as an easy yet effective method for creating garden beds. It is also a cheap way of filling your raised garden beds (have you seen how much soil costs at Bunnings??). Originating from Germany, hügelkultur gardening involves the creation of raised beds using organic materials such as logs, branches, leaves, grass clippings and compost.

At its core, hügelkultur is a gardening technique that mimics the natural processes of decomposition and nutrient cycling found in forests and woodlands. The term "hügelkultur" translates to "hill culture" in German, reflecting the mound-like shape of the garden beds created through this method. These beds are built by layering organic materials in a specific manner to create a fertile growing environment for plants.
Read on to learn more about how hügelkultur works. There’s also a step-by-step guide on how to make your own hügelkultur raised garden bed.
How Hügelkultur Works
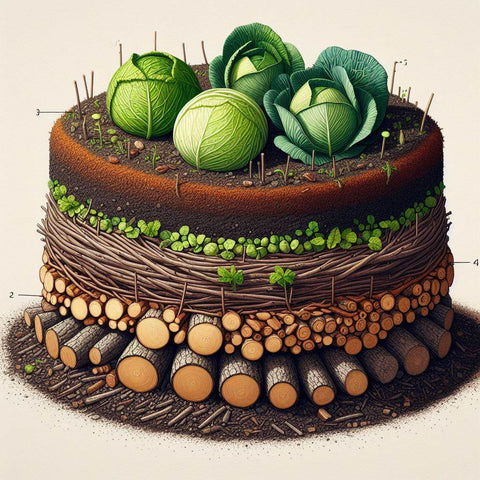
Hügelkultur beds operate on the principle of harnessing the inherent benefits of decomposition and nutrient release from organic matter. The process begins with laying down a base layer of logs and larger branches, which serve as the foundation of the bed. These woody materials gradually break down over time, releasing nutrients into the soil and creating air pockets that promote aeration and drainage.
Additional layers of organic matter such as leaves, grass clippings, straw, and kitchen scraps are also added to the bed. These materials act as a sponge, absorbing and retaining moisture while providing a steady supply of nutrients to the growing plants. The diversity of organic matter ensures a balanced and nutrient-rich soil environment, supporting healthy root development and robust plant growth.
One of the key benefits of hügelkultur gardening is its water-retention capabilities. The layers of organic matter act as a reservoir, storing moisture and reducing the need for frequent watering, especially during dry periods. This not only conserves water but also promotes drought resilience in the garden, ensuring that plants have access to the moisture they need to thrive.
Additionally, the gradual decomposition of organic materials in the hügelkultur bed contributes to long-term soil fertility and health. As the logs and branches break down, they release nutrients such as nitrogen, potassium, and phosphorus into the soil, enriching it and supporting healthy plant growth. This natural fertilization process reduces the reliance on fertilizers, making hügelkultur gardening an eco-friendly and sustainable choice for gardeners. Simply put, it enhances your soil’s health.
Furthermore, hügelkultur beds offer a habitat for beneficial soil organisms such as earthworms, fungi, and beneficial bacteria, which play vital roles in nutrient cycling, soil aeration, and disease suppression. You can also kick start this process by applying a soil inoculum like the beneficial microbe solution by Soil Cultures. By creating a diverse and thriving soil ecosystem, hügelkultur gardening fosters resilience and vitality in the garden, resulting in healthier plants and higher yields.
Below is our step-by-step guide to creating your own hügelkultur bed in a raised garden bed. We find that this method works best for raised garden beds. We did this in a Birdies round raised garden bed. For in-ground beds, a no-dig bed probably works best (although hügelkultur still works just fine).
- Selecting the Perfect Location:
Carefully assess your garden space to determine the ideal location for your hügelkultur bed. Choose a spot that receives ample sunlight and has good drainage to ensure optimal growing conditions for your plants. Accessibility for watering, maintenance, and harvesting should also be considered when selecting the site.
- Gathering Materials:
Gather a diverse array of organic materials to construct your hügelkultur bed. This may include logs, branches, twigs, leaves, grass clippings, kitchen scraps, and aged compost. Aim for a variety of materials in different sizes to create a stable base and promote air circulation within the bed.
- Building the Foundation:
Begin by laying down a base layer of logs and larger branches at the chosen location. Arrange the materials in a mound-like shape, ensuring stability and structural integrity. Layer smaller branches, twigs, and woody debris on top of the base to further build up the mound. Water well to ensure everything is soaked (without forming puddles).

- Layering Organic Matter:
Continue to layer organic matter such as leaves, straw, grass clippings, and kitchen scraps on top of the woody base. Ensure you use an even mix of green and brown material. This diverse mix of materials will serve as a reservoir for moisture and nutrients, promoting healthy soil biology and supporting robust plant growth. Water well again.

- Adding Soil
Cover the organic layers with a mixture of topsoil and compost. We used the classic Mel’s mix soil recipe. However, we did replace vermiculite with rough pumice and peat moss with coconut coir. We also added some sheep pellets for extra nutrition (are you even a Kiwi gardener if you don’t have sheep pellets handy??). Mix well and fill the raised bed to the brim. The soil will settle in over time and drop in height. Water in well.


- Plant and mulch
Get planting! Mulch well to help retain moisture as well as consistent soil temperature. Organic mulches will also break down over time and add to the soil structure and fertility.


